Posts

Here I go again...

Image
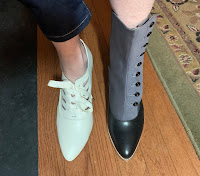
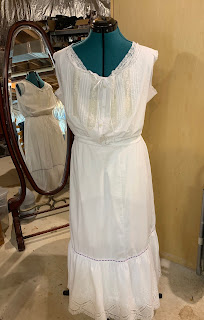
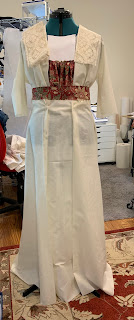
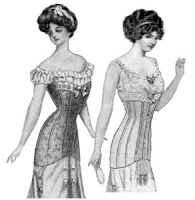
It's March, so the annual observation of the sinking of the Titanic in 1912 is just around the corner, and tis the season to make another 1912 dress.  Who wants to be seen in last year's gown?  And it will be so much easier this year because I have all of the undergarments -- which also clearly means that this year I can acquire reproduction footwear. A friend inquired recently whether I'd be blogging about my experience this year, and I said it depended on how torturous the path was.  And here I am, blogging.  Who knew it would be so difficult again this year, even without the underpinnings? After the requisite hours upon hours spent researching, I have found several inspirational images.  After ordering several dozen silk fabric swatches, I've made my decision and purchased my fabrics.  And then, after learning yesterday that the fabric I so painstakingly chose is not in stock, I went with a very close second choice.  In the meantime I've found a few supplemen

Epilogue

Image
I have had requests to provide more detailed photos of the undergarments.  And I have to admit they are really pretty!  All extant examples of period undergarments are covered with lovely lace and pintuck details, even those bought by middle class women.  It's too bad we can't all still expect this level of lovely.  I used four patterns to make these garments, as recounted in an earlier blog.  Here is what an Edwardian woman wore underneath her dress every day. The first layer is the chemise. As this layer was worn next to the skin it absorbed sweat and needed to be easily washed, it is a simple garment.   I put lace around the armholes, lace beading with white satin ribbon and lace sewn to it and the neck, and then went back over the seam using a wing needle and a pin stitch to add more detail.  I sewed all of these pieces except the corset using French seams for a nice, smooth inside.  In this era, each piece of all the undergarments in a household were monogrammed s

Finally!

Image
Late Saturday night I looked at my watch when I finally had put the last stitch in the dress and had pressed all five undergarments, and I noted that the time was 2:44 am.  I don't know it had taken four hours to sew all the buttons on and put the hem in, but clearly it had.  After an incalculable number of hours, I was finished and with no time to spare.  I needed to leave my house in a few short hours to join Vicki at 10:30 to get dressed for the tea. When I last blogged, I had completed the muslin of the dress and was ready to cut my silk, and honestly, I thought it would all be pretty straightforward from there.  Boy was I wrong.  This project has been the ultimate '2 steps forward 1 3/4 steps backwards' experience.  My seam ripper has been such a constant companion that I have almost stopped cussing each time it becomes apparent that I use it again.  So much of the construction was totally fiddly. The crazy Chinese puzzle of the closure system took quite a lot o

The Circle of Life

Image
It's April and the Titanic Tea is this month.  I can officially begin to panic.  Now that I've finished my full set of Edwardian undergarments, I've spent the last few weeks working on muslins for the dress itself.   (For those of you who have been following this blog, you will note that I have purchased a dress form, which has been indispensable.) Jim keeps wondering why I sit and stare at the dress on the form for long periods of time - it's because I'm still pondering what needs to be done, how to do it and in what order.  These are not inconsequential decisions for the finished product, and so I have created a project plan which I update regularly.  As mentioned previously, I am altering almost every piece of the pattern I have to create the look that I chose.  This choice means making the muslins is a particularly critical part of this project.  To get the bodice right I've had to make two muslins, but needed only one of the skirt.  Woo-hoo! As my desig

A Proper Edwardian Foundation

Image
After what seems like a solid month of sewing and 8 yards of 60" cotton lawn, 1 yard of cotton coutil, 10 yards of coiled steel boning, 6 yards of lace beading, 6 yards of lace edging, 17 yards of cotton eyelet border, 2 yards of insertion lace, 1 yard of vintage lace, 14 yards of cotton eyelet beading, 10 yards of 1/8" ribbon and 3 patterns - I am finally the proud owner of a full set of Edwardian undergarments: a chemise, corset, drawers, petticoat and corset cover.  Truth be told, the petticoat and the corset cover are each awaiting the arrival of one more piece of lace, and then they'll be complete.  Whew!  I really had moments - days - when I thought I would not get all of this done in time to begin work on the dress itself. As I've been sewing this mountain of undergarments, I've been pondering how to make the dress that I want from the information and patterns that I have.  Several of the books I found have scaled patterns of dresses from var

Building a Corset

Image
My husband is always very supportive of all of my new endeavors.  I have to say, though, that his enthusiasm for and offers of assistance with this new project reached new heights as soon as he heard "corset."  I purchased Truly Victorian's 1913 Late Edwardian Corset Pattern which listed all of the various bits and pieces needed to build it, size 00 grommets among them. We have a grommet setter that we bought from a retiring seamstress and costume designer last summer, and we didn't have the cutter and setter for size 00.  My husband become even more keen about this project as soon as he learned there was a tool needed that he didn't yet own!  From Corsetmaking.com (who knew?) I procured all of the other parts: 2 busks (I was unsure which size would work best), a roll of coiled steel boning, bone casing, coutil, boning tips, corset lacing and 8" garters. The pattern instructions direct one to take certain measurements - bust, waist, hips - of oneself

For Want of a Nail

Image
It looks like my reticule will be the first item finished.  You may wonder why?  Well, let me just say that this is not what my pert chart showed. intended dress pattern From the strategic planning perspective, from the moment I decided on my dress I have had to make a lot of alterations to my pattern to end up with a dress that looks like the one I'm copying (right) rather than the one on the pattern cover (left).  Considering this process further, one must appreciate that the entire idea of corsets has always been to shape bodies into a specific shape.  This being the case, in order to make the alterations to the pattern and then check the fit of the resulting muslin prototypes, I'd either have to put the corset on every time I need to check the fit or I need a dress form shaped like me in my late Edwardian corset.   After pondering this dilemma I decided to make a dress form of my corseted self.  There are tons of videos on YouTube that show how, of